ReadyOp’s tabs allow administrators to easily segregate different parts of their dashboard into different sections. Objects can easily be added to tabs and arranged however an organization may want the data to be presented.
Creating a Tab
- Modifying a tab first requires you to be in “Designer Mode”. To toggle designer mode on or off, start by clicking “Menu” in the upper right corner of the dashboard’s toolbar.
- In the menu drop down, select “Enable Designer” to enable designer mode.
- Once enabled, a new tab icon will appear after the last tab on your dashboard.
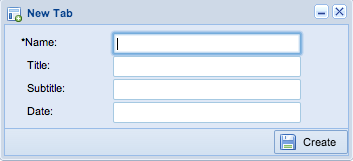
 Clicking this icon will bring up the new tab dialog.
Tab Information
A couple pieces of information are used to identify tabs and make life easier on your users. Explanations are as follows;
- Name
- This is the name that appears in the clickable tab itself, the part that user’s click on to open the tab’s content.
- Title
- The title is displayed in a large font on the tab after a user has opened it. This doesn’t have to be the same as the tab name itself. For example, the tabs name could be “HICS”, while the tab’s title could be “Bravo County Hospitals”.
- Subtitle
- Subtitles are displayed under the title when viewing the tab. Given the previous example, an appropriate subtitle may be “Hospital Incident Command Structure”.
- Date
- The date is a user defined field.
Updating a Tab
- Updating an existing tab first requires you to be in “Designer Mode”.
- To toggle designer mode on or off, start by clicking “Menu” in the upper right corner of the dashboard’s toolbar.
- In the menu drop down, select “Enable Designer” to enable designer mode.
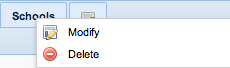
- Once enabled, you’ll be able to right click on any of the tabs on your dashboard that you’d like to modify and select the “Modify” option. This will then bring up the “Modify” tab dialog.
Deleting a Tab
- Deleting an existing tab first requires you to be in “Designer Mode”.
- To toggle designer mode on or off, start by clicking “Menu” in the upper right corner of the dashboard’s toolbar.
- In the menu drop down, select “Enable Designer” to enable designer mode.
- Once enabled, you’ll be able to right click on any of the tabs on your dashboard that you’d like to delete and select the “Delete” option.
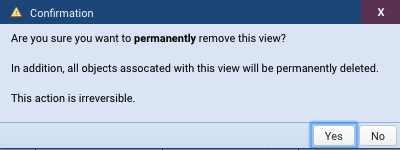
Warning: Deleting a tab is permanent and will remove all objects on the tab.
- You’ll be prompted with a confirmation dialog asking if you’re sure you want permanently delete the alert.